(→Trivia) Tag: rte-source |
m (Reverted edits by 68.117.221.118 (talk) to last version by Xendou) |
||
| (29 intermediate revisions by 17 users not shown) | |||
| Line 5: | Line 5: | ||
<div class="toclimit-3">__TOC__</div> |
<div class="toclimit-3">__TOC__</div> |
||
| + | |||
==Location== |
==Location== |
||
| − | Lautrec is found imprisoned on the top floor of the church in [[Undead Parish]], before climbing the ladders to the roof where the [[Bell Gargoyles]] are fought. The [[Mystery Key]] that opens his cell |
+ | Lautrec is found imprisoned on the top floor of the church in [[Undead Parish]], before climbing the ladders to the roof where the [[Bell Gargoyles]] are fought. The [[Mystery Key]] that opens his cell (which can also be opened with the [[Master Key]]) is found in the cellar-like area next to the [[Fang Boar]] guarding the gates to the inner parish. |
After being freed, or escaping after the Gargoyles are defeated if he wasn't freed by the player, Lautrec is found sitting in [[Firelink Shrine]] across from the imprisoned [[Fire Keeper]], [[Anastacia of Astora]]. If Lautrec was freed, then it is here that he will reward the player with a [[Sunlight Medal]]. |
After being freed, or escaping after the Gargoyles are defeated if he wasn't freed by the player, Lautrec is found sitting in [[Firelink Shrine]] across from the imprisoned [[Fire Keeper]], [[Anastacia of Astora]]. If Lautrec was freed, then it is here that he will reward the player with a [[Sunlight Medal]]. |
||
| − | + | If the player frees Lautrec and receives his reward at Firelink Shrine, he can be summoned to assist against the Bell Gargoyles and the [[Gaping Dragon]]. His first summon sign is near the ladder before the [[Fog Door]]; the second summon is opposite from [[Solaire]]'s, hidden behind a pillar near the Gaping Dragon's fog door. |
|
| − | + | Whether or not Lautrec was freed, after the player rings the second [[Bells of Awakening|Bell of Awakening]] or picks up the [[Fire Keeper Soul]] in [[Blighttown]], Lautrec will kill Anastacia and begin a quest line in which the player can collect a [[Black Eye Orb]] along with [[Dingy Set|Anastacia's robes]], and hunt Lautrec down to retrieve the Fire Keeper's Soul in [[Anor Londo]]. |
|
==Strategy== |
==Strategy== |
||
| − | Lautrec dual |
+ | Lautrec dual-wields [[Shotel]]s, allowing him to partially hit through block. Therefore, dodging his attacks or killing him as quickly as possible will work best. He also wears a [[Red Tearstone Ring]], so be extra careful when he is near-death. Additionally, he may use a parrying dagger to [[Parry and Riposte|parry and riposte]] players. |
| − | If fought at Firelink Shrine, Lautrec can |
+ | If fought at [[Firelink Shrine]], Lautrec can safely be kicked off the ledge. Quit and load the game, and his items should be right in front of the player. |
| − | If fought in Anor Londo, Lautrec will have a [[Lautrec's Comrade, Sorcerer|sorcerer]] and a [[Pike]] |
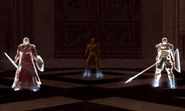
+ | If fought in [[Anor Londo]], Lautrec will have a [[Lautrec's Comrade, Sorcerer|sorcerer]] and a [[Pike]]-wielding [[Lautrec's Comrade, Warrior|warrior]] guarding him. The player is only required to kill Lautrec, so they may choose to concentrate on him and hope to kill him before his companions cause any trouble. An easy way to do this is to go up the staircases to the left or right, then aggro Lautrec with a [[Bows|bow]]. Lautrec is faster than the rest of his party and will run up the stairs first, which then allows the player to engage him alone atop the chokepoint. |
| − | [[Poison Arrow]]s can prove effective on both Lautrec and his companions. In addition, firing them from where the player spawns in |
+ | [[Poison Arrow]]s can prove effective on both Lautrec and his companions. In addition, firing them from where the player spawns in his world will not make them aggro. This lets the player kill without retaliation. |
| − | A very easy way to defeat |
+ | A very easy way to defeat him consists of wearing both the [[Ring of Fog]] and the [[Slumbering Dragoncrest Ring]]. The player must then approach him and his companions by walking along either of the hall's walls until they reach the area behind him, then they may approach him from behind and [[Backstab|backstab]] him. If the player's weapon is strong enough, a single backstab will suffice. Even if he survives, his two comrades will not react as they are slightly in front of him, allowing the player to finish the job. Once behind Lautrec, the Ring of Fog can be switched for the [[Hornet Ring]] to increase the damage. One can also use [[Hush]] to remove the need of the Slumbering Dragoncrest Ring, although they must be careful not to move after the effect expires. |
==Lore== |
==Lore== |
||
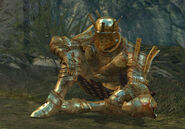
| − | + | Lautrec's armor reveals that he was an adherent of the goddess [[Fina]]. The armor description states that Lautrec "forsook everything" because he believed in Fina's love for him. This could either mean that Lautrec was delusional, or that the goddess truly loved him deeply and personally, as interactions between gods and humans are quite common in ''Dark Souls''. |
|
| − | Lautrec's goals were never explained in the game. He mentions that he is on a "mission", yet it is never elaborated upon. He |
+ | Lautrec's goals were never explained in the game. He mentions that he is on a "mission", yet it is never elaborated upon. He interacted with, and was possibly tricked by [[Patches]] at least once prior to meeting the player, and he knows of Petrus and his background. It could be that Anastacia was killed for her Fire Keeper Soul, but it is found on his person after defeating him, meaning he either had neglected to use it or kept it as a trophy. |
==Notes== |
==Notes== |
||
| + | *Once [[Reah of Thorolund|Reah]] and her bodyguards [[Vince of Thorolund|Vince]] and [[Nico of Thorolund|Nico]] leave [[Firelink Shrine]] and [[Petrus of Thorolund|Petrus]] has returned from the trip, Lautrec will offer a tip to the player at the cost of 100 [[soul]]s per [[Level Up|soul level]], in which he informs that they went "below the Catacombs" and that her bodyguards either fled or were reduced to hollows, leaving her alone; hinting to travel to the [[Tomb of the Giants]] and investigate their whereabouts. |
||
| − | * |
+ | *Lautrec's armor, the [[Favor Set]], will appear on the same level as the [[Anor Londo#Bonfires|Chamber of the Princess]] [[Bonfire (Dark Souls)|bonfire]] room, after the player has killed him in [[Anor Londo]]. |
| − | *Up to 4 liquid |
+ | *Up to 4 [[Humanity (Item)|liquid humanities]] (8 in [[New Game Plus|NG+]]) can be drained from Lautrec using the [[Dark Hand]]. |
| ⚫ | *Lautrec is a useful summon to keep around, should the player be wandering a high-traffic [[Player versus Player|PvP]] area, as his Shotels make an excellent distraction. Should the invader focus their attacks on the player, Lautrec has a chance of attacking from behind for a backstab. Lautrec is also extremely good at both parries and dodge-rolls for an NPC, which means aggressive invaders can find themselves countered at a bad moment. On higher difficulties, his HP is substantially higher, making him a go-to PvP ally for the [[Undead Parish|Parish]] and [[Depths]]. |
||
| + | *To summon Lautrec for the Bell Gargoyles, the player must first free him then talk to him in Firelink Shrine and rest at a bonfire for his summon sign to appear. |
||
| − | ==Character |
+ | ==Character information== |
| − | ===Health and |
+ | ===Health and stats=== |
{{H&S |
{{H&S |
||
| variable = Location |
| variable = Location |
||
| Line 208: | Line 212: | ||
==Trivia== |
==Trivia== |
||
| − | *Lautrec is likely a spiritual successor to [[w:c:demonssouls:Yurt the Silent Chief|Yurt]] from ''[[Demon's Souls]]''. Both are found imprisoned and |
+ | *Lautrec is likely a spiritual successor to [[w:c:demonssouls:Yurt the Silent Chief|Yurt]] from ''[[Demon's Souls]]''. Both are found imprisoned and the player can rescue them, both use shotels and parrying daggers, and both are hostile towards the player later in the game. They even share identical quotes such as, ''"Now I can continue my work...keh heh heh"''. |
*Lautrec, like many characters, has unused dialogue cut from the game. |
*Lautrec, like many characters, has unused dialogue cut from the game. |
||
| ⚫ | *Lautrec is a useful summon to keep around, should the player be wandering a high-traffic [[Player |
||
==Gallery== |
==Gallery== |
||
| − | <gallery captionalign="center"> |
+ | <gallery position="center" captionalign="center"> |
lautrec.jpg|In Firelink Shrine |
lautrec.jpg|In Firelink Shrine |
||
Lautrec with comrades.png|Lautrec flanked by his comrades in Anor Londo |
Lautrec with comrades.png|Lautrec flanked by his comrades in Anor Londo |
||
IMG 20130908 174501.jpg|Lautrec without his helm |
IMG 20130908 174501.jpg|Lautrec without his helm |
||
</gallery> |
</gallery> |
||
| + | [[pl:Rycerz Lautrek z Carim]] |
||
[[Category:Dark Souls: Characters]] |
[[Category:Dark Souls: Characters]] |
||
[[Category:Dark Souls: Enemies]] |
[[Category:Dark Souls: Enemies]] |
||
Revision as of 16:09, 14 June 2020
- "Oh, hello. I'm considering a change of location... I have a rather, pressing matter to attend to up above. That Keeper has served me well, but...enough with her... Keh heh heh heh..."
- — Knight Lautrec of Carim
Knight Lautrec of Carim, also known as Lautrec the Embraced or Lautrec the Guilty when invading, is a character in Dark Souls. He is voiced by either Daniel Roberts or Will Vanderpuye.
Location
Lautrec is found imprisoned on the top floor of the church in Undead Parish, before climbing the ladders to the roof where the Bell Gargoyles are fought. The Mystery Key that opens his cell (which can also be opened with the Master Key) is found in the cellar-like area next to the Fang Boar guarding the gates to the inner parish.
After being freed, or escaping after the Gargoyles are defeated if he wasn't freed by the player, Lautrec is found sitting in Firelink Shrine across from the imprisoned Fire Keeper, Anastacia of Astora. If Lautrec was freed, then it is here that he will reward the player with a Sunlight Medal.
If the player frees Lautrec and receives his reward at Firelink Shrine, he can be summoned to assist against the Bell Gargoyles and the Gaping Dragon. His first summon sign is near the ladder before the Fog Door; the second summon is opposite from Solaire's, hidden behind a pillar near the Gaping Dragon's fog door.
Whether or not Lautrec was freed, after the player rings the second Bell of Awakening or picks up the Fire Keeper Soul in Blighttown, Lautrec will kill Anastacia and begin a quest line in which the player can collect a Black Eye Orb along with Anastacia's robes, and hunt Lautrec down to retrieve the Fire Keeper's Soul in Anor Londo.
Strategy
Lautrec dual-wields Shotels, allowing him to partially hit through block. Therefore, dodging his attacks or killing him as quickly as possible will work best. He also wears a Red Tearstone Ring, so be extra careful when he is near-death. Additionally, he may use a parrying dagger to parry and riposte players.
If fought at Firelink Shrine, Lautrec can safely be kicked off the ledge. Quit and load the game, and his items should be right in front of the player.
If fought in Anor Londo, Lautrec will have a sorcerer and a Pike-wielding warrior guarding him. The player is only required to kill Lautrec, so they may choose to concentrate on him and hope to kill him before his companions cause any trouble. An easy way to do this is to go up the staircases to the left or right, then aggro Lautrec with a bow. Lautrec is faster than the rest of his party and will run up the stairs first, which then allows the player to engage him alone atop the chokepoint.
Poison Arrows can prove effective on both Lautrec and his companions. In addition, firing them from where the player spawns in his world will not make them aggro. This lets the player kill without retaliation.
A very easy way to defeat him consists of wearing both the Ring of Fog and the Slumbering Dragoncrest Ring. The player must then approach him and his companions by walking along either of the hall's walls until they reach the area behind him, then they may approach him from behind and backstab him. If the player's weapon is strong enough, a single backstab will suffice. Even if he survives, his two comrades will not react as they are slightly in front of him, allowing the player to finish the job. Once behind Lautrec, the Ring of Fog can be switched for the Hornet Ring to increase the damage. One can also use Hush to remove the need of the Slumbering Dragoncrest Ring, although they must be careful not to move after the effect expires.
Lore
Lautrec's armor reveals that he was an adherent of the goddess Fina. The armor description states that Lautrec "forsook everything" because he believed in Fina's love for him. This could either mean that Lautrec was delusional, or that the goddess truly loved him deeply and personally, as interactions between gods and humans are quite common in Dark Souls.
Lautrec's goals were never explained in the game. He mentions that he is on a "mission", yet it is never elaborated upon. He interacted with, and was possibly tricked by Patches at least once prior to meeting the player, and he knows of Petrus and his background. It could be that Anastacia was killed for her Fire Keeper Soul, but it is found on his person after defeating him, meaning he either had neglected to use it or kept it as a trophy.
Notes
- Once Reah and her bodyguards Vince and Nico leave Firelink Shrine and Petrus has returned from the trip, Lautrec will offer a tip to the player at the cost of 100 souls per soul level, in which he informs that they went "below the Catacombs" and that her bodyguards either fled or were reduced to hollows, leaving her alone; hinting to travel to the Tomb of the Giants and investigate their whereabouts.
- Lautrec's armor, the Favor Set, will appear on the same level as the Chamber of the Princess bonfire room, after the player has killed him in Anor Londo.
- Up to 4 liquid humanities (8 in NG+) can be drained from Lautrec using the Dark Hand.
- Lautrec is a useful summon to keep around, should the player be wandering a high-traffic PvP area, as his Shotels make an excellent distraction. Should the invader focus their attacks on the player, Lautrec has a chance of attacking from behind for a backstab. Lautrec is also extremely good at both parries and dodge-rolls for an NPC, which means aggressive invaders can find themselves countered at a bad moment. On higher difficulties, his HP is substantially higher, making him a go-to PvP ally for the Parish and Depths.
- To summon Lautrec for the Bell Gargoyles, the player must first free him then talk to him in Firelink Shrine and rest at a bonfire for his summon sign to appear.
Character information
Health and stats
| Location | Health | Souls | ||
| NG | NG+ | NG | NG+ | |
| Undead Parish | 862 | 1,751 | 1,000 | 4,000 |
| Firelink Shrine | 862 | 1,751 | 1,000 | 4,000 |
| Anor Londo | 985 | 1,724 | 3,267 | 3,267 |
Defenses
| Location | Physical Defenses | Elemental Defenses | Resistances | |||||||
|---|---|---|---|---|---|---|---|---|---|---|
| Undead Parish | 256 | 248 | 282 | 256 | 166 | 196 | 155 | C | C | C |
| Firelink Shrine | 256 | 248 | 282 | 256 | 166 | 196 | 155 | C | C | C |
| Anor Londo | 303 | 294 | 331 | 303 | 207 | 236 | 194 | B | B | B |
These stats are sourced from FuturePress's Official Dark Souls Strategy Guide.
Equipment
| Right Hand | Left Hand | |
 Shotel +6 |
 Parrying Dagger +6 |
 Shotel +6 |
| Head | Chest | Hands | Legs |
 Helm of Favor +4 |
 Embraced Armor of Favor +4 |
 Gauntlets of Favor +4 |
 Leggings of Favor +4 |
| Right Hand | Left Hand | |
 Shotel +12 |
 Parrying Dagger +12 |
 Shotel +12 |
| Head | Chest | Hands | Legs |
 Helm of Favor +5 |
 Embraced Armor of Favor +5 |
 Gauntlets of Favor +5 |
 Leggings of Favor +5 |
Drops
| Item |  Ring of Favor and Protection |
 Humanity ×5 |
 Fire Keeper Soul |
 Souvenir of Reprisal |
| Drop Rate | Guaranteed | Guaranteed | Guaranteed (Anor Londo) |
Guaranteed (Anor Londo) |
Dialogue
| Click to see Dialogue (Contains Spoilers) | ||||||||||||||||||||||||||||||||||||||||||||||||
|---|---|---|---|---|---|---|---|---|---|---|---|---|---|---|---|---|---|---|---|---|---|---|---|---|---|---|---|---|---|---|---|---|---|---|---|---|---|---|---|---|---|---|---|---|---|---|---|---|
|
Trivia
- Lautrec is likely a spiritual successor to Yurt from Demon's Souls. Both are found imprisoned and the player can rescue them, both use shotels and parrying daggers, and both are hostile towards the player later in the game. They even share identical quotes such as, "Now I can continue my work...keh heh heh".
- Lautrec, like many characters, has unused dialogue cut from the game.


