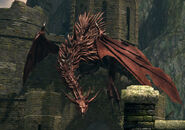
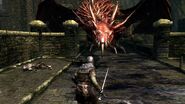
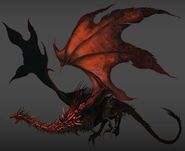
The Hellkite Dragon, also known as the Red Drake or Bridge Wyvern, is a miniboss in Dark Souls.
Location
It is located on the bridge leading to the Undead Parish, although it makes a brief appearance when the player first enters the Undead Burg. It guards the bridge until it is killed. If the player avoids it and runs to the bonfire behind it, the hellkite will fly off, returning when trying to cross the bridge again.
Lore
The Hellkite Dragon is not a true Dragon, but a Drake. Drakes are seen as underdeveloped imitators of the dragons, but are more likely their distant kin. [2]
Strategy
- Can be killed with very few shots from the Dragonslayer Greatbow while wearing the Hawk Ring — each shot deals nearly 300 damage.
- Warrior of Sunlight covenant players can use the Lightning Spear miracle to dispatch the dragon safely. Simply go to the bridge's underside, on the ledge that leads to the rats (after dispatching the rats), and aim at the dragon's head, and it will die in ~8 Lightning spears. If the player has a bow (or buys one from the Undead Burg Merchant) they can aim at its head with the crosshairs, switch to the Talisman, and fire away (be careful of the step forward taken on cast, best to walk back to the corner and aim every time).
- If at the end of the bridge near Solaire, one can provoke the dragon to fly in by walking a few meters on the bridge then sprinting back to safety.
- While the dragon is on the bridge, if the player travels far enough towards Solaire, the dragon will lose interest, turn around, and return to its perch. It is possible to walk back and forth causing the dragon to alternate between turning to face the player and turning away. As it does this dance, the dragon is unable to heal or attack. By doing this, the player can then slowly kill it with arrows while it turns uselessly. This threshold is particularly easy to work with headshots from the Black Bow of Pharis with the Hawk Ring equipped.
- There are then two ways to deal with the Drake.
- The normal route is to go down the stairs to the right and kick the ladder down. Afterwards, the player can sprint to either one of the bridge sides and wait (without provoking it) until the creature comes down to fight. One can then run to the next bonfire and rest to prevent it from breathing fire that may kill the player.
- When under the bridge, the Drake's tail will be slightly visible. If the player has a bow, enough Dexterity, and some arrows (30-40), the Drake's tail can be attacked until it falls off, granting the player the Drake Sword. (There is a glitch that sometimes causes the Drake to die too.)
- The Drake regenerates health after it has about 33% HP left. In order to kill the Drake through melee attacks, the player must lure it onto the bridge. Hiding behind the walls near the stairs, that lead below the bridge, can help defend the player against the Hellkite's flame attacks. After roughly ten seconds, the Drake will jump down and engage the player in melee range. [note 1]
- One can stand under the bridge next to where the three Undead Rats spawn and subsequently snipe the Drake in the head and body after it jumps into the middle of the bridge. To counter act the healing effect, several hundred Large Arrows will effectively kill the Drake. Despite this, the Drake will still commence healing once, but the arrows should stop it from healing again.
- If one acquires the Slumbering Dragoncrest Ring by either completing Sen's Fortress, or by killing Griggs, the player can travel up the ladder shortcut from the Undead Burg to the middle of the bridge. If the Hellkite Dragon is standing on the bridge, it will not hear you and you can freely cut off its tail and kill it from behind.
- Before a certain patch, the dragon could also be killed by making it fall out of the map; standing on the tower where the greatsword-wielding Black Knight was and shooting the dragon with a ranged weapon provokes it into jumping on the bridge, leaving the spawning range, and promptly vanishing. Shortly after, the player will hear the dragon dying and will receive 10,000 souls. After the patch, the dragon will still disappear but not die, reappearing with the normal trigger to make it appear.
Notes
- It is possible to prevent the Drake appearing at all if the player has the Master Key. This involves running through the Valley of Drakes to the Darkroot Basin and up Havel's watchtower to reach the first Bell of Awakening. The Drake's appearance only triggers if the player has passed the point where it appears in Undead Burg, so as long as the player does not cross that point, it will not attack the bridge.
Enemy information
Attacks
Crossing the Burg
| Attack Type | Parryable | Tracking | Speed | ||||
|---|---|---|---|---|---|---|---|
| - | - | 650 | - | Fire | No | AoE | Fast |
As the Red Drake flies towards its perch above the Undead Parish entrance, it breathes fire upon the bridge. Can only be avoided by descending the stairs in the middle of the bridge.
Fire Breath
| Attack Type | Parryable | Tracking | Speed | ||||
|---|---|---|---|---|---|---|---|
| - | - | 230 | - | Fire | No | AoE | Fast |
The Red Drake exhales a plume of flame which covers the entire bridge. It can only be avoided by hiding against the walls in the middle of the bridge that face away from the dragon.
Forward Stomp
| Attack Type | Parryable | Tracking | Speed | ||||
|---|---|---|---|---|---|---|---|
| 350 | - | - | - | Strike | No | Neither | Medium |
The Red Drake moves forward to crush the player with one of its front feet. Can be dodged by rolling under the Drake. Can also be blocked, but causes heavy stamina drain.
Stomp
| Attack Type | Parryable | Tracking | Speed | ||||
|---|---|---|---|---|---|---|---|
| 350 | - | - | - | Strike | No | Neither | Medium |
Similar to the Front Stomp, however, the Red Drake uses this when the player is much closer to it. Affects a small area beneath it. Can be dodged by either rolling to one side, or by rolling away from the Drake.
Head Ram
| Attack Type | Parryable | Tracking | Speed | ||||
|---|---|---|---|---|---|---|---|
| 350 | - | - | - | Strike | No | Neither | Medium |
The Red Drake rears its head to one side, and then sweeps it across the width of the bridge. Can be avoided by either rolling into or away from the attack.
Tail Whip
| Attack Type | Parryable | Tracking | Speed | ||||
|---|---|---|---|---|---|---|---|
| 350 | - | - | - | Strike | No | Neither | Slow |
Used when the Red Drake is on the bridge and the player is far away, unless the player has already cut off its tail (such as to obtain the Drake Sword). Can be avoided by rolling towards and under the attack.
Jumping Flame Dash
| Attack Type | Parryable | Tracking | Speed | ||||
|---|---|---|---|---|---|---|---|
| 350 | - | 230 | - | Strike / Fire | No | AoE | Medium |
The Red Drake hovers in the air, and then dashes towards the player, whilst exhaling flame on the bridge. Can only be avoided by descending the stairs in the middle of the bridge.
Defenses
| Physical Defenses | Elemental Defenses | Resistances | |||||||
| 198 | 198 | 198 | 238 | 159 | 396 | 99 | S | S | S |
These stats are sourced from FuturePress's Official Dark Souls Strategy Guide.
Drops
| Item |  Drake Sword |
| Drop Rate | Sever tail |
Trivia
- If the drake's tail is cut off, it will remain absent even after resting at a bonfire or the player leaves the area, but will reappear once the player dies.
- The term "Hellkite" is most famously used for red dragons in the Magic: The Gathering card game, and may be a reference to them. The term also appears in Shakespeare's Macbeth, Act IV, scene 3.
Gallery
References
- ↑ Approximate HP value — the exact number was not recorded.
- ↑ Drake Sword description.
Footnotes
- ↑ Its health regeneration is in effect as of Patch 1.05.


