No edit summary Tag: Visual edit |
Tigt (Message Wall | contribs) No edit summary Tag: Visual edit |
||
| Line 16: | Line 16: | ||
==Description== |
==Description== |
||
| − | Prior to |
+ | Prior to awakening, it rests motionless on a rock face. When awakened, flames ignite out of the four spikes on its back and the multiple sets of eyes open aglow, then it drops down on two reptilian feet. |
| + | |||
| + | The creature has a total of six demonic centipede heads: two on its back, two as arms, and the last two as the head and tail. The heads can extend, spit fireballs, and be cut off The right "arm" is the biggest head and has the longest range. The left one is used to grab opponents and put them in its toothed chest. Its powerful legs let it jump tremendously high. |
||
==Lore== |
==Lore== |
||
| Line 22: | Line 24: | ||
==Notes== |
==Notes== |
||
| − | *The Centipede Demon is susceptible to both [[Magic (damage type)|magic]] and [[Lightning (damage type)|lightning]] damage, but is |
+ | *The Centipede Demon is susceptible to both [[Magic (damage type)|magic]] and [[Lightning (damage type)|lightning]] damage, but is immune to fire. |
| − | *It is possible to skip |
+ | *It is possible to skip this boss by being Rank 2 or higher in the [[Chaos Servant]] [[covenant]] to open the shortcut to [[Lost Izalith]]. If the player does not use the shortcut, the Orange Charred Ring it drops is vital to get through Lost Izalith. |
| ⚫ | *Players can sever the Centipede Demon's tail or arm up to 5 times, as they slowly regenerate during the battle. Its severed limbs become enemies that chase the player. The first severed limb rewards the player with the Orange Charred Ring early, instead of at the end of the battle. Subsequent severed limbs offer no reward, but temporally reduce the range of the demon's attacks. |
||
| − | *The Orange Charred Ring is a vital item to get through Lost Izalith if the player does not employ the above shortcut. |
||
| ⚫ | |||
| ⚫ | *Players can sever the Centipede Demon's tail or arm up to |
||
| ⚫ | *It is possible to have a relatively safe fight with high endurance, defense and fire defense. After several extending pounces, the demon will usually perform a wind-up smash and then get very close to fog door. Staying between the monster's legs will force it to do high jumps and exploding jumps. The demon will also try to consume the player sometimes, but staying close to its legs after it lands and blocking while the demon is in the air is a good way to stay alive and land successive shots to the knee. Explosive jumps are still dangerous, though. |
||
| ⚫ | *The player can summon [[Solaire of Astora]] to |
||
| ⚫ | *A useful strategy for the Centipede Demon is to sever its right head, spawning the head as a separate enemy. Upon killing the head, the player will acquire the Orange Charred Ring. The player can then exit the arena with a Homeward Bone or quitting, then reenter with the ring equipped. Doing so allows access to the whole boss arena, letting them charge the demon while taking only minor lava damage. This lets the player have more room to maneuver. |
||
| ⚫ | *It is possible to have a relatively safe fight |
||
| ⚫ | *A useful strategy |
||
==Boss information== |
==Boss information== |
||
| Line 44: | Line 45: | ||
}} |
}} |
||
| − | At long range, the Centipede Demon throws its right arm |
+ | At long range, the Centipede Demon throws its right arm at the player, dealing substantial damage if it connects. The Centipede Demon will only track the player until halfway through its charging animation. Otherwise, it is easily side-dodged if timed properly. |
[[File:Centipede-Extend.gif|center]] |
[[File:Centipede-Extend.gif|center]] |
||
| Line 60: | Line 61: | ||
}} |
}} |
||
| − | This medium |
+ | This medium-range attack can be avoided with a precisely timed roll. Players will see the Centipede Demon jump whilst spinning in preparation for a ground smash using one of its heads. |
[[File:Centipede-Windup.gif|center]] |
[[File:Centipede-Windup.gif|center]] |
||
| Line 76: | Line 77: | ||
}} |
}} |
||
| − | The Centipede Demon will swipe at the ground with its hand. This can be avoided by rolling under it |
+ | The Centipede Demon will swipe at the ground with its hand. This can be avoided by rolling under it or running away. |
[[File:Centipede-Swipe.gif|center]] |
[[File:Centipede-Swipe.gif|center]] |
||
| Line 92: | Line 93: | ||
}} |
}} |
||
| − | A swipe with its left arm |
+ | A swipe with its left arm. If it connects, grabs the player and devours them with its fiery belly. This attack is highly damaging, possibly fatal, so stay behind the Centipede Demon as often as possible. |
| − | + | An attentive player may either avoid or take minimal damage by rapidly mashing the left and right-hand light attack buttons '''immediately''' as the player is grabbed, breaking free of the demon's grasp. |
|
[[File:Centipede-Consume.gif|center]] |
[[File:Centipede-Consume.gif|center]] |
||
| Line 110: | Line 111: | ||
}} |
}} |
||
| − | The Centipede Demon leaps into the air |
+ | The Centipede Demon leaps into the air and brings its vast weight down nearly exactly where it jumped from. Extremely damaging, yet simple to avoid — move away when it jumps. The Centipede Demon tends to roar after this attack, leaving it vulnerable. |
[[File:Centipede-High-Jump.gif|center]] |
[[File:Centipede-High-Jump.gif|center]] |
||
| Line 126: | Line 127: | ||
}} |
}} |
||
| − | + | If the player consistently stays near its heels or back, the Centipede Demon will stomp its feet for moderate damage. |
|
[[File:Centipede-Stomp.gif|center]] |
[[File:Centipede-Stomp.gif|center]] |
||
| Line 142: | Line 143: | ||
}} |
}} |
||
| − | When the Centipede Demon's health is low, it will |
+ | When the Centipede Demon's health is low, it will often leap into the air and throw a giant fireball at the ground. It deals high fire damage and has a wide area of effect. |
[[File:Centipede-Exploding-Jump.gif|center]] |
[[File:Centipede-Exploding-Jump.gif|center]] |
||
| Line 168: | Line 169: | ||
===='''Demon Head Bug'''==== |
===='''Demon Head Bug'''==== |
||
| − | Chopping off the Centipede Demon's tail or arm |
+ | Chopping off the Centipede Demon's tail or arm will have the severed appendage crawl and bite at the player. While not especially threatening, it can prove a fatal distraction if not dispatched quickly. Up to five heads can chase after the player. |
[[File:Centipede-Severed.gif|center]] |
[[File:Centipede-Severed.gif|center]] |
||
| Line 192: | Line 193: | ||
==Trivia== |
==Trivia== |
||
| − | * |
+ | *The [[Capra Demon]] and the Centipede Demon fights share the same background music. |
| − | *The Centipede Demon can be seen clinging to the cliff wall opposite the first [[bonfire (Dark Souls)|bonfire]] in the Demon Ruins. |
+ | *The Centipede Demon can be seen clinging to the cliff wall opposite the first [[bonfire (Dark Souls)|bonfire]] in the Demon Ruins. It cannot be fought or damaged at this point. |
==Gallery== |
==Gallery== |
||
Revision as of 22:09, 20 November 2018
- For other uses, see Demon (disambiguation).
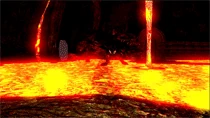
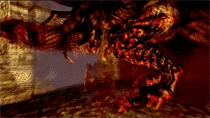
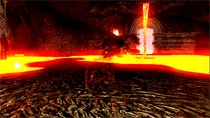
Centipede Demon is an optional boss found in the Demon Ruins.
Location
The Centipede Demon is located in the Demon Ruins.
Description
Prior to awakening, it rests motionless on a rock face. When awakened, flames ignite out of the four spikes on its back and the multiple sets of eyes open aglow, then it drops down on two reptilian feet.
The creature has a total of six demonic centipede heads: two on its back, two as arms, and the last two as the head and tail. The heads can extend, spit fireballs, and be cut off The right "arm" is the biggest head and has the longest range. The left one is used to grab opponents and put them in its toothed chest. Its powerful legs let it jump tremendously high.
Lore
The sisters of Chaos gave Ceaseless Discharge the Orange Charred Ring to lessen his pain. However, he mistakenly dropped it, and thus, the Centipede Demon emerged from the very spot it landed.[1]
Notes
- The Centipede Demon is susceptible to both magic and lightning damage, but is immune to fire.
- It is possible to skip this boss by being Rank 2 or higher in the Chaos Servant covenant to open the shortcut to Lost Izalith. If the player does not use the shortcut, the Orange Charred Ring it drops is vital to get through Lost Izalith.
- Players can sever the Centipede Demon's tail or arm up to 5 times, as they slowly regenerate during the battle. Its severed limbs become enemies that chase the player. The first severed limb rewards the player with the Orange Charred Ring early, instead of at the end of the battle. Subsequent severed limbs offer no reward, but temporally reduce the range of the demon's attacks.
- The player can summon Solaire of Astora to help. His summon sign is located just before the demon's Fog Gate. Solaire can help distract the boss but tends to suffer heavy damage despite having his own Orange Charred Ring, due to often engaging the demon while it's still in lava.
- It is possible to have a relatively safe fight with high endurance, defense and fire defense. After several extending pounces, the demon will usually perform a wind-up smash and then get very close to fog door. Staying between the monster's legs will force it to do high jumps and exploding jumps. The demon will also try to consume the player sometimes, but staying close to its legs after it lands and blocking while the demon is in the air is a good way to stay alive and land successive shots to the knee. Explosive jumps are still dangerous, though.
- A useful strategy for the Centipede Demon is to sever its right head, spawning the head as a separate enemy. Upon killing the head, the player will acquire the Orange Charred Ring. The player can then exit the arena with a Homeward Bone or quitting, then reenter with the ring equipped. Doing so allows access to the whole boss arena, letting them charge the demon while taking only minor lava damage. This lets the player have more room to maneuver.
Boss information
Attacks
Extending Punch
| Attack Type | Parryable | Tracking | Speed | ||||
|---|---|---|---|---|---|---|---|
| 460 | 0 | 0 | 0 | Strike | No | Neither | Medium |
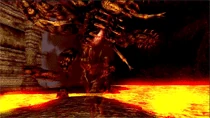
At long range, the Centipede Demon throws its right arm at the player, dealing substantial damage if it connects. The Centipede Demon will only track the player until halfway through its charging animation. Otherwise, it is easily side-dodged if timed properly.
Wind-Up Smash
| Attack Type | Parryable | Tracking | Speed | ||||
|---|---|---|---|---|---|---|---|
| ??? | 0 | 0 | 0 | Strike | No | Both | Medium |
This medium-range attack can be avoided with a precisely timed roll. Players will see the Centipede Demon jump whilst spinning in preparation for a ground smash using one of its heads.
Swipe
| Attack Type | Parryable | Tracking | Speed | ||||
|---|---|---|---|---|---|---|---|
| 460 | 0 | 0 | 0 | Strike | No | Neither | Slow |
The Centipede Demon will swipe at the ground with its hand. This can be avoided by rolling under it or running away.
Consume[notes 1]
| Attack Type | Parryable | Tracking | Speed | ||||
|---|---|---|---|---|---|---|---|
| 299 | 0 | 0 | 0 | Strike | No | Neither | Medium |
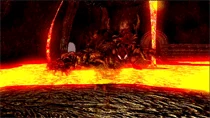
A swipe with its left arm. If it connects, grabs the player and devours them with its fiery belly. This attack is highly damaging, possibly fatal, so stay behind the Centipede Demon as often as possible.
An attentive player may either avoid or take minimal damage by rapidly mashing the left and right-hand light attack buttons immediately as the player is grabbed, breaking free of the demon's grasp.
High Jump
| Attack Type | Parryable | Tracking | Speed | ||||
|---|---|---|---|---|---|---|---|
| 506 | 0 | 0 | 0 | Strike | No | Neither | Slow |
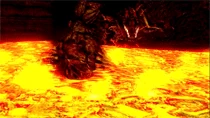
The Centipede Demon leaps into the air and brings its vast weight down nearly exactly where it jumped from. Extremely damaging, yet simple to avoid — move away when it jumps. The Centipede Demon tends to roar after this attack, leaving it vulnerable.

Alternating Stomp
| Attack Type | Parryable | Tracking | Speed | ||||
|---|---|---|---|---|---|---|---|
| 575 | 0 | 0 | 0 | Strike | No | Both | Fast |
If the player consistently stays near its heels or back, the Centipede Demon will stomp its feet for moderate damage.
Exploding Jump
| Attack Type | Parryable | Tracking | Speed | ||||
|---|---|---|---|---|---|---|---|
| 690 | 0 | 0 | 0 | Regular | No | Neither | Medium |
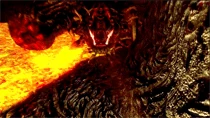
When the Centipede Demon's health is low, it will often leap into the air and throw a giant fireball at the ground. It deals high fire damage and has a wide area of effect.
Thrash
| Attack Type | Parryable | Tracking | Speed | ||||
|---|---|---|---|---|---|---|---|
| ??? | 0 | 0 | 0 | Strike | No | Neither | Medium |
Wildly swings its arm and tail in a circle around itself.
Shoot Fireballs
| Attack Type | Parryable | Tracking | Speed | ||||
|---|---|---|---|---|---|---|---|
| 0 | 0 | ??? | 0 | Fire | no | no | Medium |
Throws two fireballs from its back. Only performed when player is at extreme range.
Demon Head Bug
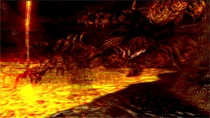
Chopping off the Centipede Demon's tail or arm will have the severed appendage crawl and bite at the player. While not especially threatening, it can prove a fatal distraction if not dispatched quickly. Up to five heads can chase after the player.
Defenses
| Physical Defenses | Elemental Defenses | Resistances | |||||||
| 269 | 269 | 269 | 269 | 174 | ∞ | 215 | A | A | B |
These stats are sourced from FuturePress's Official Dark Souls Strategy Guide.
Drops
| Item |  Orange Charred Ring |
| Drop Rate | Guaranteed (or sever limb) |
Trivia
- The Capra Demon and the Centipede Demon fights share the same background music.
- The Centipede Demon can be seen clinging to the cliff wall opposite the first bonfire in the Demon Ruins. It cannot be fought or damaged at this point.
Gallery
")
")
")
")
")
")
")
Videos
")
Music

Footnotes
- ↑ Damage listed is per bite.
References
- ↑ Orange Charred Ring description.